# Frontend events

Frontend events are the triggers that happen on a **page.** It's often – but not always – initiated by a user. Frontend events will only trigger as long as the page is open.

Frontend events can still lead to actions happening on the server – but the *event* (or trigger) happens on the page.

## Element events

One of the first and most basic types of triggers are the result of actions taken by the users of your app directly by interacting with an element. For example, a user could click the *Submit* or *Save* button in order to start a sequence of actions that saves the values the user has provided in the database.

Element events include:

* Button/icon/other element clicked
* [Input form](#user-content-fn-1)[^1] values being updated
* An element [hits an error](#user-content-fn-2)[^2]

Adding more elements (and elements from plugins) can add to the list of possible element events.

### Example: Button click

Let's first have a look at one of the most fundamental events an app can have: responding to the click of a button. First, we'll add an element of the type *Button* to the page:

<figure><img src="https://34394582-files.gitbook.io/~/files/v0/b/gitbook-x-prod.appspot.com/o/spaces%2F-M5sbzwG7CljeZdkntrL%2Fuploads%2FzaNLaYPJ4zerHUg3xCfY%2FCleanShot%202023-03-16%20at%2013.01.48.png?alt=media&#x26;token=dde3b632-f97c-4587-902e-e0d767ca1058" alt=""><figcaption></figcaption></figure>

Next, we'll use one of Bubble's shortcuts to assign an event to the button:

<figure><img src="https://34394582-files.gitbook.io/~/files/v0/b/gitbook-x-prod.appspot.com/o/spaces%2F-M5sbzwG7CljeZdkntrL%2Fuploads%2FeQ60xsLDl20winN2xzYg%2Fadd-event-to-button.gif?alt=media&#x26;token=44cf2e42-f198-4a43-b982-ca525554990b" alt=""><figcaption></figcaption></figure>

To add a workflow to a button, right-click it and select *Start/edit workflow*. Keep in mind that an event is the first step of a workflow. As soon as you click it, you will be taken to the workflow editor:

<figure><img src="https://34394582-files.gitbook.io/~/files/v0/b/gitbook-x-prod.appspot.com/o/spaces%2F-M5sbzwG7CljeZdkntrL%2Fuploads%2FkJaVANOGOMaxeHsW7pzY%2Fadd-actions-to-workflow%402x.png?alt=media&#x26;token=b689e35c-8e7e-4b82-914e-b8392b796a31" alt=""><figcaption></figcaption></figure>

You will see that a workflow has been created with an event. At the top of it is the word *When* followed by an auto-generated label: *When Button A is clicked*. You can then proceed to add actions to the workflow by clicking *Click here to add an action*.

### Example: Input value changed

{% hint style="info" %}
For this type of event we also have a video lesson:

Video: [How to Trigger Workflows From Input Changes](https://www.youtube.com/watch?v=mDEVJLujlkQ)
{% endhint %}

In the next example, we'll look at how you can set up a workflow to run whenever the user changes the value provided in an input form. Changes are registered in two different ways:

* Text-based elements: Whenever the element loses focus
* Click-based elements (such as dropdowns and calendars): Whenever the user confirms their choice with a click

We'll start again with adding an element. Pick one of the elements in the *Input form* category; we're going with a regular text input element:

<figure><img src="https://34394582-files.gitbook.io/~/files/v0/b/gitbook-x-prod.appspot.com/o/spaces%2F-M5sbzwG7CljeZdkntrL%2Fuploads%2Frs3EtL99S3ZtzmMU1I6p%2Fcreate-input-element%402x.png?alt=media&#x26;token=b35b2d73-c6bd-4098-ad1f-6579bcd21feb" alt=""><figcaption></figcaption></figure>

We'll use a shortcut this time too. In the case of input elements, we can also use the Start/edit workflow *to* create an event. Bubble will recognize the element type and automatically set the event to respond to the element's value being updated:

<figure><img src="https://34394582-files.gitbook.io/~/files/v0/b/gitbook-x-prod.appspot.com/o/spaces%2F-M5sbzwG7CljeZdkntrL%2Fuploads%2FFepnpkRHayQrMNux9cJj%2Fstart-workflow-input-form%402x.png?alt=media&#x26;token=5488f857-0273-4e62-8a66-4eac19fb2bba" alt=""><figcaption></figcaption></figure>

Again you will be taken to the workflow editor and there will be a new workflow automatically labelled by the event:

<figure><img src="https://34394582-files.gitbook.io/~/files/v0/b/gitbook-x-prod.appspot.com/o/spaces%2F-M5sbzwG7CljeZdkntrL%2Fuploads%2FD2QW3hA3Zk8BTlZbnSbC%2Finput-value-changed-workflow%402x.png?alt=media&#x26;token=64e0888b-7f8f-45c3-ad97-f9d012f214d8" alt=""><figcaption></figcaption></figure>

You can then proceed to add the needed actions in response the input's value being changed.

{% hint style="info" %}
To automatically save changes to the database when an input form's value is changed, you can also use auto-binding. This will save the value without the need to set up a workflow.

Article section: [Auto-binding](https://manual.bubble.io/~/changes/dOhSa1gIjoidqk3W2fhT/data/the-database/creating-saving-and-deleting-data#auto-binding)
{% endhint %}

### Example: catching errors

{% hint style="info" %}
For this type of event we also have a video lesson:

Video: [How to Use the Element Has Error Event](https://www.youtube.com/watch?v=_HNvvPxcWAU\&t=1s)
{% endhint %}

Sometimes, trying to run a workflow in Bubble will result in an error. For example, a user might be trying to log in, but provide the wrong credentials. In this case, Bubble will by default alert the user in a browser-standard message:

<figure><img src="https://34394582-files.gitbook.io/~/files/v0/b/gitbook-x-prod.appspot.com/o/spaces%2F-M5sbzwG7CljeZdkntrL%2Fuploads%2FihYy5BdJUSeCgC1fI4cR%2Flogin-error.png?alt=media&#x26;token=84cd0916-efb9-422f-996f-d014f41d6b90" alt=""><figcaption><p>System errors will result in a standard error message like this in Chrome, but you can override that message by setting up an event to catch it. Click the image to enlarge.</p></figcaption></figure>

The An element hits an error event is connected to the workflow that triggered the event. In other words, if the user entered the wrong password, the *Log in* button is the trigger – not the input field, since the button is the one that triggers the workflow where the error happened.

We want to show an alert that we are free to style as we want, so let's first add an *Alert* element to the page and set it to appear at the top of the page:

<figure><img src="https://34394582-files.gitbook.io/~/files/v0/b/gitbook-x-prod.appspot.com/o/spaces%2F-M5sbzwG7CljeZdkntrL%2Fuploads%2F7roR1AZb2sX2U35vqKVX%2Falert-top%402x.png?alt=media&#x26;token=d87fd6e1-750f-4ab6-98de-4452f8350066" alt=""><figcaption><p>Checking the <em>Position the alert at the top</em> box lets us stick the alert to the top of the screen regardless of scrolling position.</p></figcaption></figure>

Then, we'll create the event/workflow. This time we'll need to create it in the workflow editor:

<figure><img src="https://34394582-files.gitbook.io/~/files/v0/b/gitbook-x-prod.appspot.com/o/spaces%2F-M5sbzwG7CljeZdkntrL%2Fuploads%2FfMLTqnsyskC5wMyT33Rg%2Felement-error-workflow.png?alt=media&#x26;token=5a2f201a-ed67-4e19-bde9-31c6b5fea719" alt=""><figcaption><p>
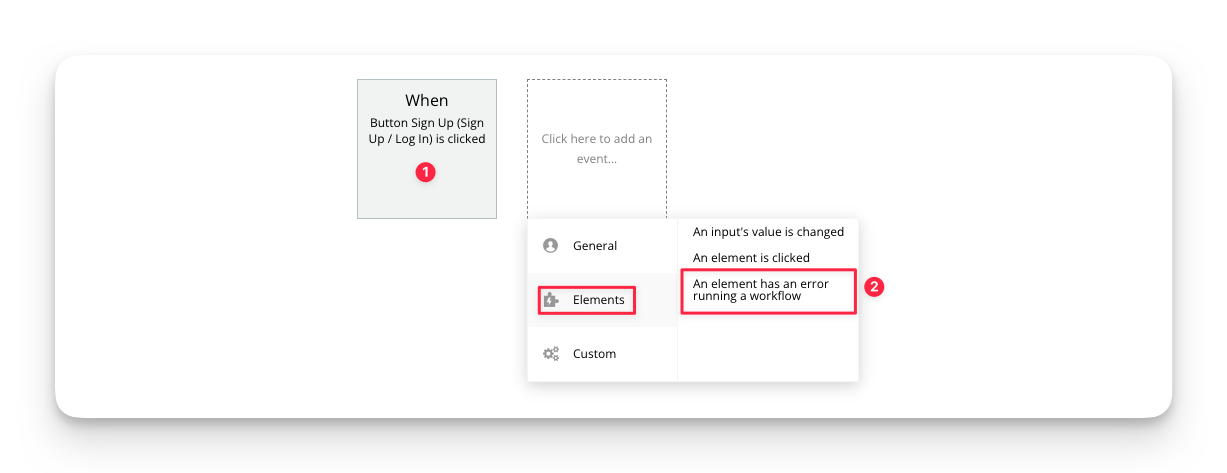
Keep in mind that for the error workflow to work, we also need the original workflow (1)
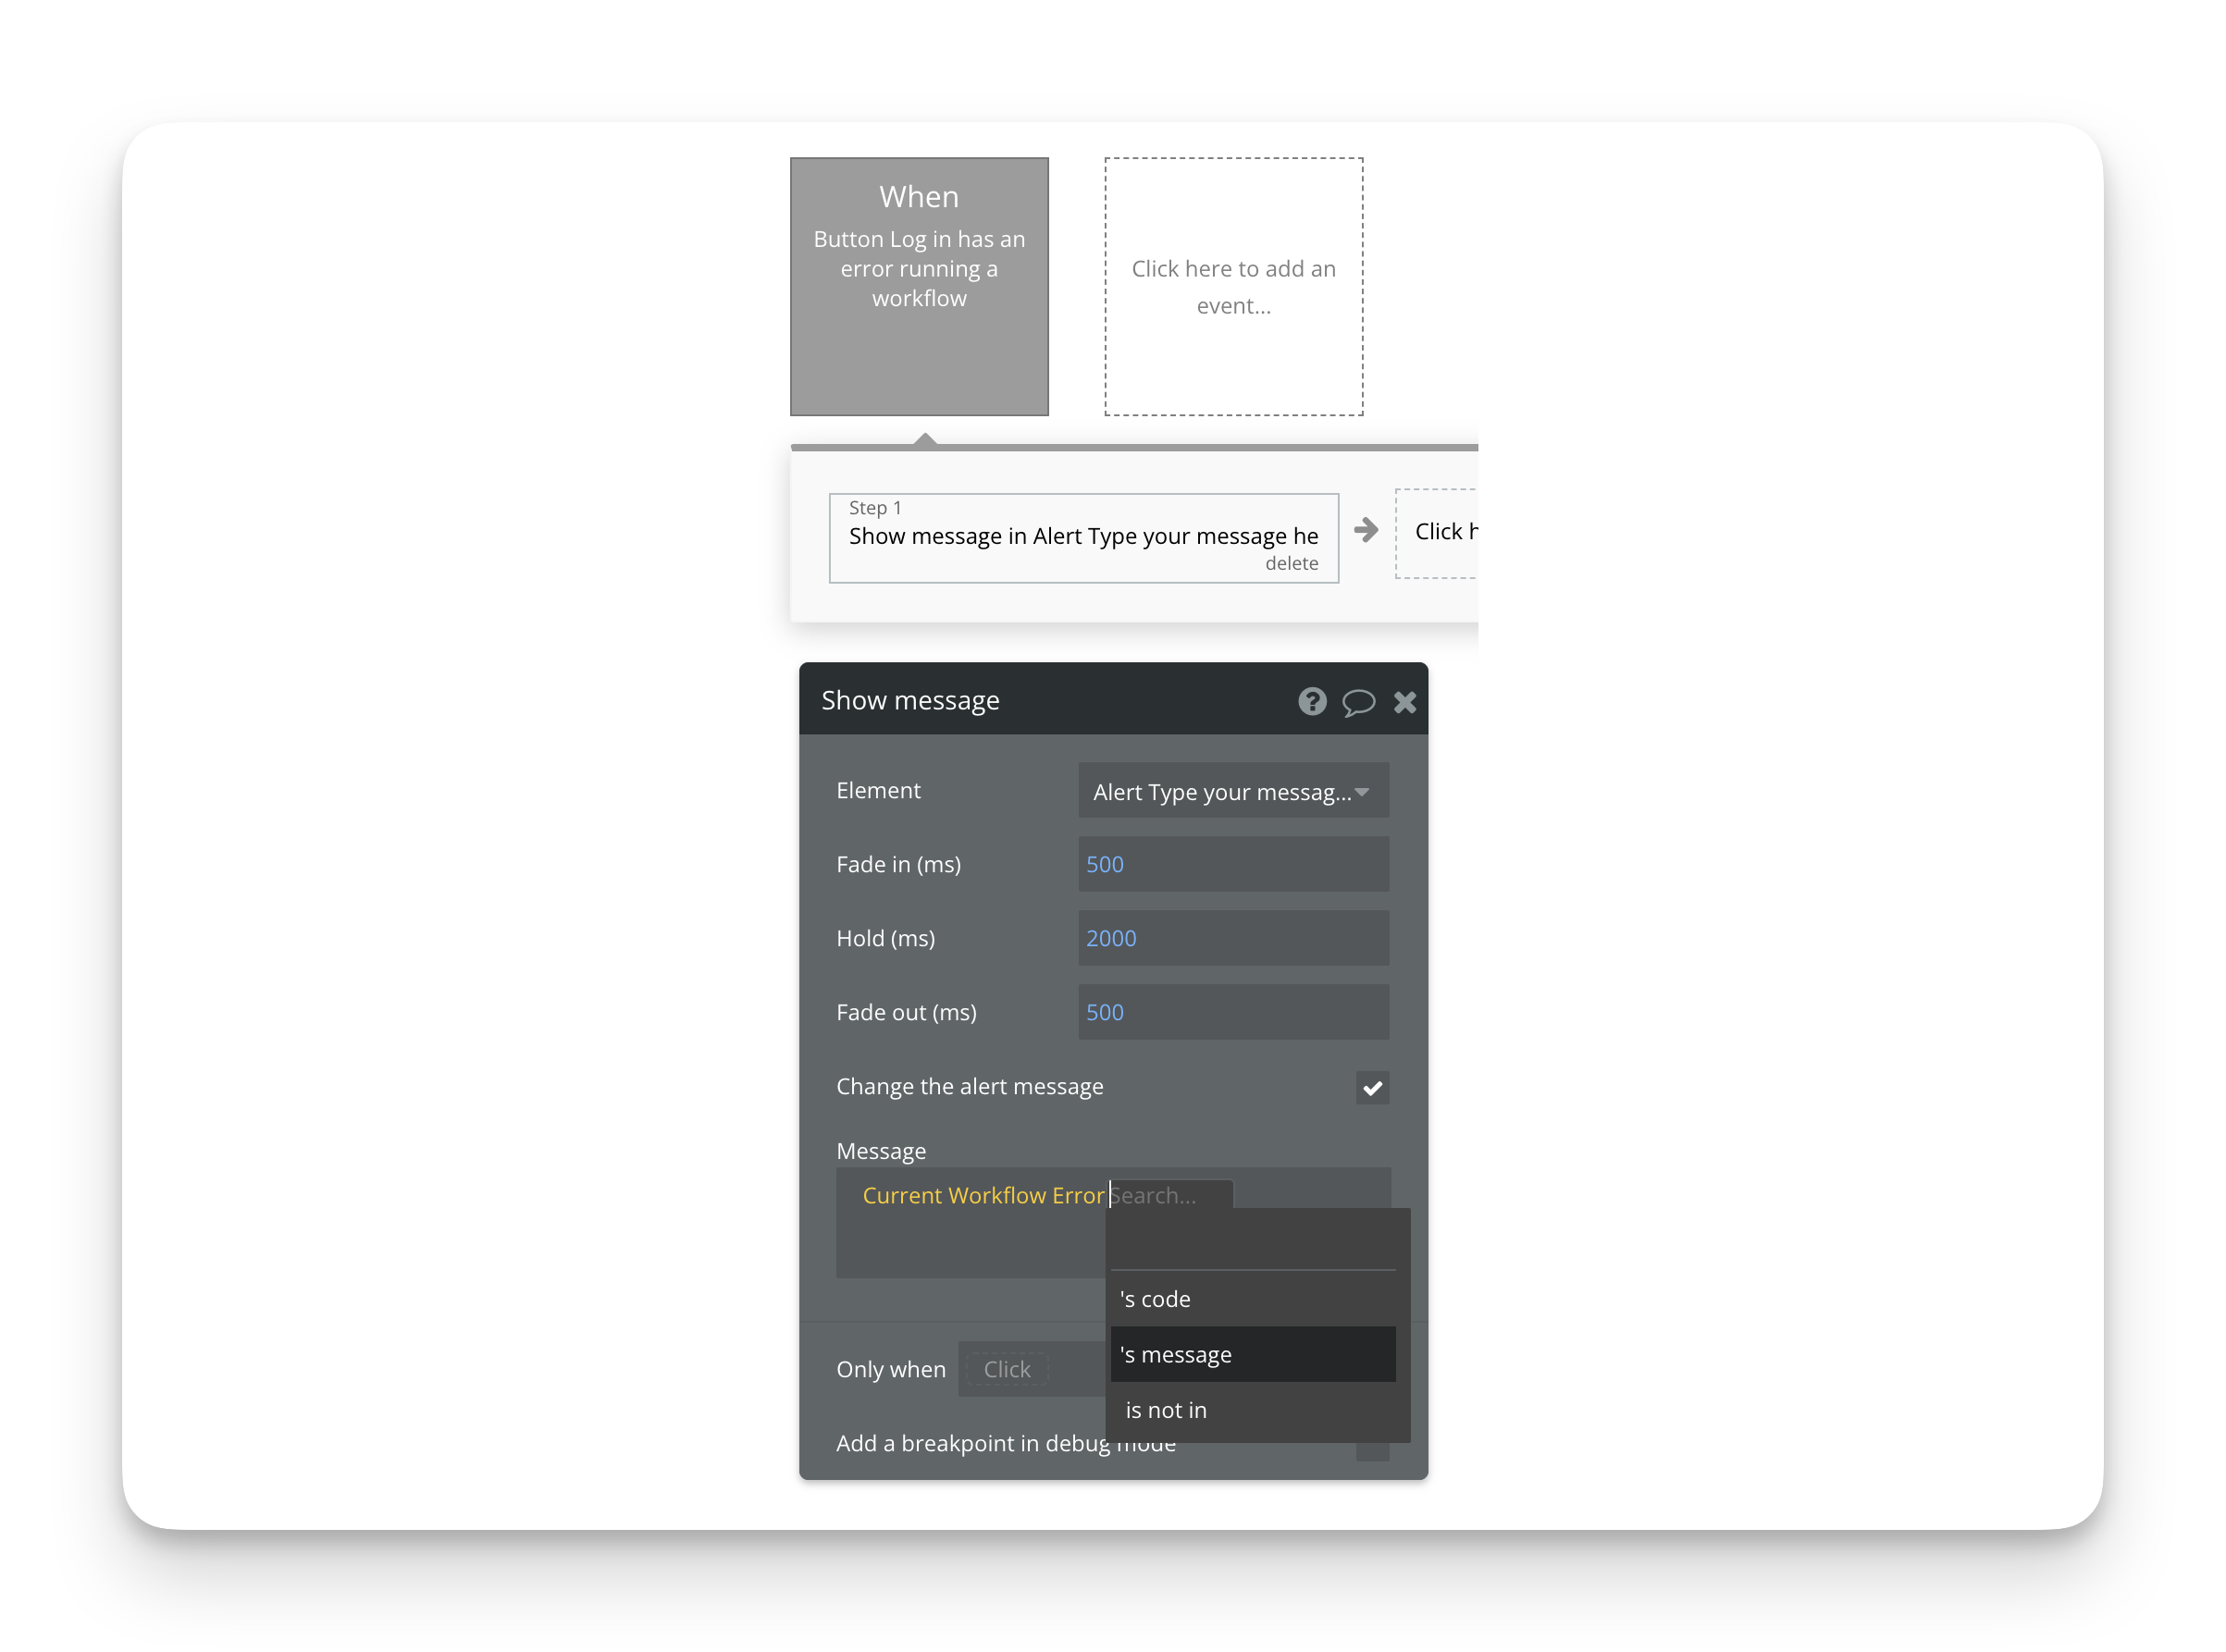
</p></figcaption></figure>

1. First, we'll need the original workflow that lets a user log in. Add an action to the button like we did in the [first example](#example-button-click).
2. Then, add the *An element has an error running a workflow* action and pick the *Log in* button

Now we have the event set up to trigger every time a workflow initiated by the *Log in* button leads to an error. Let's set it up to show the alert and use Bubble's original error message:

<figure><img src="https://34394582-files.gitbook.io/~/files/v0/b/gitbook-x-prod.appspot.com/o/spaces%2F-M5sbzwG7CljeZdkntrL%2Fuploads%2FII96MqqTE5MpJACtGqqC%2Ferror-message-and-code%402x.png?alt=media&#x26;token=87af2ca9-110f-4c4a-b05a-d29da7aaca9b" alt=""><figcaption><p>In this workflow, the data source <em>Current workflow error</em> becomes available. By picking the <em>message</em> operator we can show the relevant error message.</p></figcaption></figure>

<details>

<summary>Identifying and changing error messages</summary>

In the example above, we are using the system generated error message found in the *Current workflow error* data source.

The *message* operator will show the message that Bubble would otherwise have displayed in a standard error message. The *code* is used to identify the error. If you want a particular action to run on a certain error for example, you can use the *only when* field to set up a constraint that checks the error code.

#### Identifying codes and changing messages

All of Bubble's built-in messages are stored in [*application texts*](#user-content-fn-3)[^3] that you will find by navigating to *Settings - Language.*

The code of the error message is visible as grey, all-caps text under each text descriptor. On the right side you can edit the error message that will be displayed. This will replace the message regardless of whether you are showing it with a workflow or the default browser error message.

</details>

## General events

General events are events that are triggered by something happening on the page that is not directly related to an element. It's not necessarily (but can be) the result of a user action:

#### When the page is loaded or URL refreshed

Whenever the page is loaded or the URL refreshed (such as adding URL parameters) with the [*Go to page*](#user-content-fn-4)[^4] action, this event will trigger. This is useful for things that need to happen immediately whenever a user loads the page.

Keep in mind that as the *Go to page* action will trigger this even if the page is not technically reloaded, you may end up triggering it more times than you intended. Use a condition to avoid this.

#### The user is logged in or out

This event will trigger whenever the user's login status changes and is useful for redirecting users that are logged out for example. It will also trigger on page load according to the login status you provide, meaning that if you instruct Bubble to go to another page if the user is logged out, that event will immediately trigger when the user tries to load the page.

Note that the *Log out user's other sessions* launched from another device may not trigger the event immediately, but will trigger it once the user takes some further action on the page.

{% embed url="<https://www.youtube.com/watch?v=TfaMZ8ZagyI>" %}

{% embed url="<https://www.youtube.com/watch?v=7zIKYl6u1lk>" %}

#### An unhandled error occurs

This event in principle does the same as the above-mentioned *An element hits an error,* but applies more broadly: *any* error, regardless of the element (if any) that caused it, will trigger it and allow you to run some actions in response. This is useful if the response you want is an error message for example; by not binding it to a specific element, you can catch all errors in one event.

{% embed url="<https://www.youtube.com/watch?v=VC2_8yiTD44>" %}

#### When a condition is true

Triggering an event when a condition is true uses conditional expressions to check whether something is true or false in real-time. This is a powerful feature that lets you set up logical rules that trigger a workflow instantly whenever the expression returns a *yes*.

{% embed url="<https://www.youtube.com/watch?v=6mqbQ37y32c>" %}

### Example: Conditional expression

Let's use the *When a condition is true* event combined with a conditional expression to make something happen. This time, instead of logging in, we'll change it to signing up: when the user has provided both an email and a password, we'll animate the *Sign up* button to encourage the user to click it.

Add two input fields (for email and password) and a button for signing up. Make sure you set the *Content format* on each of the fields to Email and Password respectively. Then, we'll set up the event to catch it. We don't only want the input fields to not be empty; we want them to be *valid*.

First, add the event. You'll find this under *General events*:

<figure><img src="https://34394582-files.gitbook.io/~/files/v0/b/gitbook-x-prod.appspot.com/o/spaces%2F-M5sbzwG7CljeZdkntrL%2Fuploads%2FUkWBsDFfM0xPLkygQviv%2Fdo-when-condition-is-true%402x.png?alt=media&#x26;token=8747f7d2-7ce6-4888-8e4a-27fabdba8d65" alt=""><figcaption></figcaption></figure>

Then, we'll set up the expression that checks the input fields:

<figure><img src="https://34394582-files.gitbook.io/~/files/v0/b/gitbook-x-prod.appspot.com/o/spaces%2F-M5sbzwG7CljeZdkntrL%2Fuploads%2FNDchMAxzBsK8tJvzOkVb%2Finputs-valid-expression%402x.png?alt=media&#x26;token=398a2c0c-3bad-46b6-9aa0-9fee39c3010f" alt=""><figcaption><p>Click the image to enlarge.</p></figcaption></figure>

1. We're fine with the animation appearing just once, so we'll leave the *Run this* dropdown set at *Just once*.
2. In the expression we are checking both inputs, and using an *and* operator to make sure that *both* inputs need to be valid, as opposed to just one (in which case we would have used the *or* operator).\
   \
   We need to check four things in this expression to make it work the way we want:<br>
   1. Input Email's value must not be empty (meaning it must contain text)
   2. Input Email must be valid (meaning it must be a valid email)
   3. Input Password's value must not be empty
   4. Input Password must be valid (technically, all passwords are valid, but you can choose to set a required password strength for example)<br>
3. We then use the *Animate an element* to animate the button. We chose the subtle *Callout pulse* animation for this

<figure><img src="https://34394582-files.gitbook.io/~/files/v0/b/gitbook-x-prod.appspot.com/o/spaces%2F-M5sbzwG7CljeZdkntrL%2Fuploads%2FdJpyQdM9dghuAHt8cQpK%2FCleanShot%202023-03-16%20at%2013.44.04.gif?alt=media&#x26;token=be6747a1-bec4-40ec-84bd-261007e06889" alt=""><figcaption></figcaption></figure>

[^1]: *Input forms* are elements that accept some sort of information provided by the user, such as a text field, a checkbox, a datepicker/calendar or dropdown.\
    \
    Article: [Input forms](https://manual.bubble.io/~/changes/dOhSa1gIjoidqk3W2fhT/help-guides/design/elements/input-forms)\
    Reference: [Input forms](https://manual.bubble.io/~/changes/dOhSa1gIjoidqk3W2fhT/core-resources/elements/input-forms)

[^2]: If an error occurs during a workflow, that error is connected to the element that triggered the event. For example, a user could provide the wrong password while trying to log in.

    You can "catch" this error and respond to it (by showing a message for example) by using the *An element has an error running a workflow* event.\
    \
    Reference: [An element has an error running a workflow](https://manual.bubble.io/~/changes/dOhSa1gIjoidqk3W2fhT/core-resources/events/element-events#an-element-has-an-error-running-a-workflow)\
    Video: [How to use An element has an error running a workflow](https://www.youtube.com/watch?v=_HNvvPxcWAU)

[^3]: App texts, short for *Application texts and messages* is a sort of database for text strings that you can use around your app. It includes Bubble's built-in system messages and can be translated into different languages.\
    \
    Article: [App texts (translations)](https://manual.bubble.io/~/changes/dOhSa1gIjoidqk3W2fhT/help-guides/data/static-data/app-texts-translations)

[^4]: The *Go to page* action is used to send the user to a page in your app. It's also used to change the *Page thing* or update URL parameters.\
    \
    Reference: [To to page](https://manual.bubble.io/~/changes/dOhSa1gIjoidqk3W2fhT/core-resources/actions/navigation#go-to-page-...)
