OneSignal Web Notifications
OneSignal web notifications can be used to send marketing blasts, personalized messages, or other custom notifications directly to your users’ computers. To add this functionality to your Bubble app, install the OneSignal plugin and make an account with OneSignal.
Show notification prompt
Show a prompt for users to enable notifications.
Note: Because the plugin depends on having access to an app's Live version URL, it requires apps to be on the Personal plan and above in order to be fully set up.
Opt out of notifications
Opt the current user out of notifications.
Send notification to individual
Send notifications directly to a user or list of users in your Bubble database. When you prompt a user to enable notifications and they agree, we send OneSignal the unique ID of their User Thing, so you’re able to send a targeted web push as easily as you would run a search in your Bubble database.
User
User to receive OneSignal notification
Contents
Notification content
Title (optional)
Notification title
URL (optional)
Destination URL when notification clicked
Icon URL (optional)
Image URL to use as notification icon
Send notification to list of users
List of Users
List of users to receive OneSignal notification
Contents
Notification content
Title (optional)
Notification title
URL (optional)
Destination URL when notification clicked
Icon URL (optional)
Image URL to use as notification icon
Send notification to Segment
Segment Name
Name of OneSignal segment to receive notification
Contents
Notification content
Title (optional)
Notification title
URL (optional)
Destination URL when notification clicked
Icon URL (optional)
Image URL to use as notification icon
Send template to individual
Send custom OneSignal templates to Bubble Users, segments, or by tag filters. Templates are notifications you can design right in the OneSignal dashboard. This tool is great for visualizing the message you send before you send it, as well as saving a notification (in OneSignal) for re-use. To send a template to a user, you must access the template ID, which can be found by navigating to Messages > Templates in the OneSignal dashboard. After you get your template formatted the way you want it, click on “View/Edit” in the “options” dropdown on your desired template.
The ID can then be copied from the URL as seen below.
User
User to receive OneSignal notification
Template ID
Notification template ID from OneSignal dashboard
Send template to list of users
List of Users
List of users to receive One Signal notification
Template ID
Notification template ID from OneSignal dashboard
Send template to Segment
Segment Name
Name of OneSignal segment to receive notification
Template ID
Notification template ID from OneSignal dashboard
Send template by tag filter
Tag Key
Tag key for filter on OneSignal device
Tag Value
Tag value for filter on OneSignal device
Filter Relationship
Filter relationship to determine which users receive notification. Choose from: equals, does not equal, greater than, or less than
Template ID
Notification template ID from OneSignal dashboard
Set tag on current user
Set and delete tags on OneSignal devices (or “players”, as they are called in the OneSignal documentation) to help you make sure you’re sending targeted messages to the right people.
Tag Key
Key to set as Tag on Current User’s OneSignal device
Tag Value
Value of Tag on Current User’s OneSignal device
Delete tag on current user
Tag Key
Tag Key to delete on Current User’s OneSignal device
Send notification by tag filter
Send custom notifications to OneSignal segments and filter groups referenced by the tags you set.
Tag Key
Tag key for filter on OneSignal device
Tag Value
Tag value for filter on OneSignal device
Filter relationship
Filter relationship to determine which users receive notification. Choose from: equals, does not equal, greater than, or less than.
Contents
Notification content
Title (optional)
Notification title
URL (optional)
Destination URL when notification clicked
Icon URL (optional)
Image URL to use as notification icon
Setup
1) Set up a new app in the OneSignal dashboard. Select the Web Push platform and choose Bubble under “Wordpress plugin or website builder” as your integration, seen below.
2) Under "Site Setup", enter your Bubble app domain, making sure it starts with 'https', since all Bubble apps are fully HTTPS.
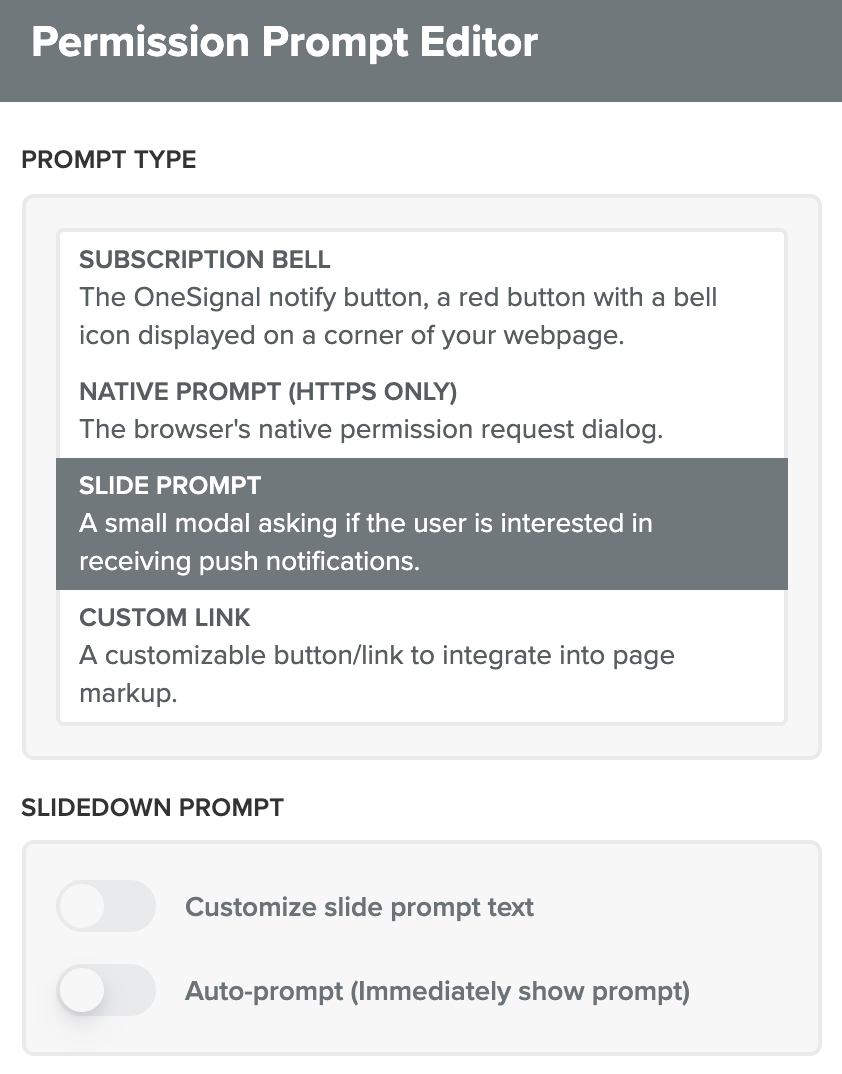
3) Under “Permission Prompt Setup”, click “Add a Prompt” and configure your notification prompt as follows:
Although the OneSignal dashboard gives you multiple options to ask users for permission to send them notifications, the best way to do this with the Bubble plugin is to choose the slide prompt and turn auto-prompt off. The plugin provides a workflow action that allows you to prompt the user whenever you want to, giving you more control over the flow of this feature. This action also automatically sends your Bubble user’s unique ID to OneSignal once they accept notifications. This allows you to send notifications directly to users in your Bubble database.You will not be able to use this feature unless autoprompt is turned off.
4) Retrieve your App ID and API Key from the OneSignal dashboard under Settings > Keys & IDs and enter them in the Bubble plugins tab. If you are experiencing issues, try putting the App ID in the "App ID (headers)" field as well.
OneSignal notifications in Safari
OneSignal automatically provides the needed certificate to work with Safari Browsers. If you already have your own Safari Web .p12 Push Certificate you can enable this and upload it and enter the password in the OneSignal Dashboard. See also OneSignal's docs for more information.
FAQ
Why aren't any of my notifications are going through?
Check to make sure you have properly configured your HTTPS settings specified in Step 2 of the “Getting Started” section. Notifications will not go through from your Bubble app without setting this up.
Why don't my notifications show up on iOS devices?
Apple mobile devices like iPhones and iPads don't currently support Web Push Notifications, so OneSignal won't work on these devices.
Why can't I send notifications directly to my Bubble users?
Make sure auto-prompt is turned off in the OneSignal dashboard, as is specified in Step 3 of “Getting Started” and that you’re using the “Show notification prompt” workflow action to ask your users for permission to send notifications. This action automatically registers your Bubble user with OneSignal, and you will not be able to directly send notifications to Bubble users without implementing this in your application.
With the OneSignal plugin, engaging with your users is streamlined, personal, and direct. Install the official OneSignal plugin in the Plugins tab of your editor to easily integrate the power of web notifications with your application!
Last updated