> For the complete documentation index, see [llms.txt](https://manual.bubble.io/llms.txt). Markdown versions of documentation pages are available by appending `.md` to page URLs; this page is available as [Markdown](https://manual.bubble.io/help-guides/data/images.md).

# Images

When you upload an image, Bubble doesn't modify the original file. No resizing, compressing, or altering happens during upload, and the original is stored exactly as you uploaded it.

For performance, though, Bubble automatically generates optimized copies of the image when it's displayed. These are created at run time and cached.

## Image caching

While Bubble doesn't modify your original image, it uses a [CDN transformation layer](#user-content-fn-1)[^1] to render images dynamically in your app.

This transformation applies specifically to images shown in image elements or as backgrounds[^2], under these conditions:

<table><thead><tr><th width="167.23046875">Condition</th><th>Detail</th></tr></thead><tbody><tr><td>Public images</td><td>The image isn't <a data-footnote-ref href="#user-content-fn-3">attached</a> to a private Bubble thing.</td></tr><tr><td>Bubble storage</td><td>The image is stored in Bubble's file storage.</td></tr><tr><td>File type</td><td><a data-footnote-ref href="#user-content-fn-4">SVG files</a> aren't <a data-footnote-ref href="#user-content-fn-5">compressed</a>, since they're vector-based and scale without losing quality.</td></tr></tbody></table>

When displaying an image, Bubble's run-mode engine works out the optimal size and compression based on the container or device resolution. It uses the transformation layer to create a temporary resized or compressed copy of the original.

Each time the image is rendered in a new context, a differently sized container or a device with a different resolution, a new copy is generated on the fly. For example:

* The same image shown as a small icon and as a full-width banner produces two differently resized versions.
* High-resolution devices may trigger higher-quality copies than standard-resolution ones.

These transformations keep loading efficient and display quality high across different devices and layouts.

Copies made through the transformation layer are stored temporarily in Bubble's cache for up to 30 days. This caching applies even if you delete the original image during that period, so the transformed versions can still be accessed for up to 30 days after deletion.

Cached copies don't count toward your storage limit, since they're managed within Bubble's performance infrastructure. If a cached version isn't available, Bubble generates a new resized copy from the original so the image always displays correctly.

<details>

<summary><strong>Advanced:</strong> how Bubble determines image sizes for caching and rendering</summary>

**Resizing**

When an image is displayed in a responsive layout, its size is often proportional to its parent container. That produces a wide variety of sizes across devices, with widths ranging continuously, for example from 150px to 2000px.

To manage this, Bubble limits the number of copies it generates by rounding each size up to the nearest value in a predefined sequence of widths:

* 128px
* 192px
* 256px
* 384px
* 512px
* 768px
* 1024px
* 1536px
* 2048px
* 3072px

This keeps the number of stored copies to roughly 10 per image, balancing performance against storage efficiency.

**Rendering**

When rendering an image, Bubble finds the closest size in this sequence that's slightly larger than the container.

For example, in a Full HD viewport (1920px wide), if the image container is 768x512 pixels, the system rounds up to the next size in the sequence, 1024px, then scales the container dimensions proportionally, requesting an image at 1024x683 pixels.

To ensure a proper fit, Bubble's engine retrieves the "max fit" version of the image, the largest size that fits within the given dimensions. The final image served might be slightly adjusted, such as 1024x585 pixels, to preserve the aspect ratio and display quality. This minimizes unnecessary resizing while delivering the best result for the user's device and layout.

This approach to resizing and caching is central to Bubble's performance infrastructure, handling images efficiently without compromising quality.

</details>

## Managing images in the Bubble editor

### Uploading images in the editor

{% hint style="warning" %}
Files uploaded through the Bubble editor aren't protected by [privacy rules](/help-guides/data/the-database/protecting-data-with-privacy-rules.md). Only upload files that are meant to be **public**.
{% endhint %}

You can upload images directly in the editor in two ways.

#### File manager

Go to the *Data* tab, in the *File manager* section, to see and search all uploaded files. To upload one, click **Upload** in the upper-right corner.

<figure><img src="https://34394582-files.gitbook.io/~/files/v0/b/gitbook-x-prod.appspot.com/o/spaces%2F-M5sbzwG7CljeZdkntrL%2Fuploads%2Fk6u7ErVzKQElOH4O3ePJ%2Ffiles-manager.png?alt=media&amp;token=5e376499-d4e0-43bc-a404-29c1f139fa5e" alt="The file manager showing a list of uploaded files with their size, type, and upload date, and the Upload button highlighted in the top-right corner."><figcaption><p>The file manager lists every uploaded file. Click Upload in the top-right corner to add a new one.</p></figcaption></figure>

{% hint style="info" %}
The file manager separates files uploaded in Development from those uploaded in Live. Use the link in the upper-right corner to switch between the two.
{% endhint %}

#### The database editor

When you edit a database thing that has an *image* field, you can upload a file directly to that field. Bubble uploads the file and links its URL to the thing.

### Deleting files in the editor

To delete image files in the editor, go to the *Data* tab, in the *File manager* section. Select the files you want to delete using the checkboxes in the list, then click **Delete** in the upper-right corner. Keep in mind that Development and Live are separate.

{% hint style="warning" %}
If you edit a database thing and remove a file from it with the *Clear* link, this only removes the URL saved on that thing. It does not delete the file.
{% endhint %}

<figure><img src="https://34394582-files.gitbook.io/~/files/v0/b/gitbook-x-prod.appspot.com/o/spaces%2F-M5sbzwG7CljeZdkntrL%2Fuploads%2FaGm7gt0EjznspA9iIL0L%2Fpost-edit.png?alt=media&amp;token=fcfad724-7413-43f7-b15e-b839fdc5d3e6" alt=""><figcaption><p>Removing an image with the <em>Clear</em> link doesn't delete the file, it only removes the URL from the database.</p></figcaption></figure>

## Managing images in a web app

### Uploading images

To upload an image, use the [*Picture uploader* element](/core-resources/bubble-elements/element-properties/web-element-properties/input-form-properties/picture-uploader-element.md). When the user clicks the element, the OS file opener dialog opens and lets the user selects which image to upload.

{% hint style="warning" %}
As soon as a user uploads a file, it's sent to the file storage server and has a live URL that anyone with the link can view, even before you've saved that URL to the database. To keep files private, see using [privacy rules with files](#uploading-private-images) below.
{% endhint %}

#### Saving the URL in the database

Once an image is uploaded through one of the elements, the element's value returns the image's URL. You then use a workflow to save that URL to an image field on the relevant data type.

<figure><img src="https://34394582-files.gitbook.io/~/files/v0/b/gitbook-x-prod.appspot.com/o/spaces%2F-M5sbzwG7CljeZdkntrL%2Fuploads%2Ff4rJFaBakyHtWbqGC1wK%2Fupload-cover-image.png?alt=media&amp;token=53297121-278e-4e7a-b9ea-73807b8088d3" alt="A workflow triggered by a cover image upload, with a Make changes to Post action that sets the post&#x27;s cover_image field to the picture uploader&#x27;s value."><figcaption><p>After the image uploads, a <a href="/core-resources/bubble-workflows/bubble-actions/database-actions.md#make-changes-to-thing">Make changes to a thing</a> action saves its URL to a field on the record. Here, the uploader's value is saved to the post's cover_image field.</p></figcaption></figure>

### Uploading private images

Private images are linked to a specific database record and inherit the privacy rules of that data type. For example, if a user uploads a cover image to their blog post, the image file is protected according to the privacy rules set on the *Post* data type.

Keeping a file private takes a few settings, in two places: the uploader element and the data type's privacy rules.

{% stepper %}
{% step %}

#### Make the file private

<figure><img src="https://34394582-files.gitbook.io/~/files/v0/b/gitbook-x-prod.appspot.com/o/spaces%2F-M5sbzwG7CljeZdkntrL%2Fuploads%2FgpOVLM4CsVbVFaekApEs%2Fmake-uploaded-file-private%202.png?alt=media&amp;token=3472a299-89bc-4d8e-bb1e-3ede6694329f" alt="The picture uploader&#x27;s properties with the Make private toggle turned on and Attach this file to set to Current page&#x27;s Post."><figcaption><p>Turn on <em>Make private</em> in the picture uploader's properties.</p></figcaption></figure>

On the uploader element, check the box *Make this file private*.<br>
{% endstep %}

{% step %}

#### Attach it to a thing

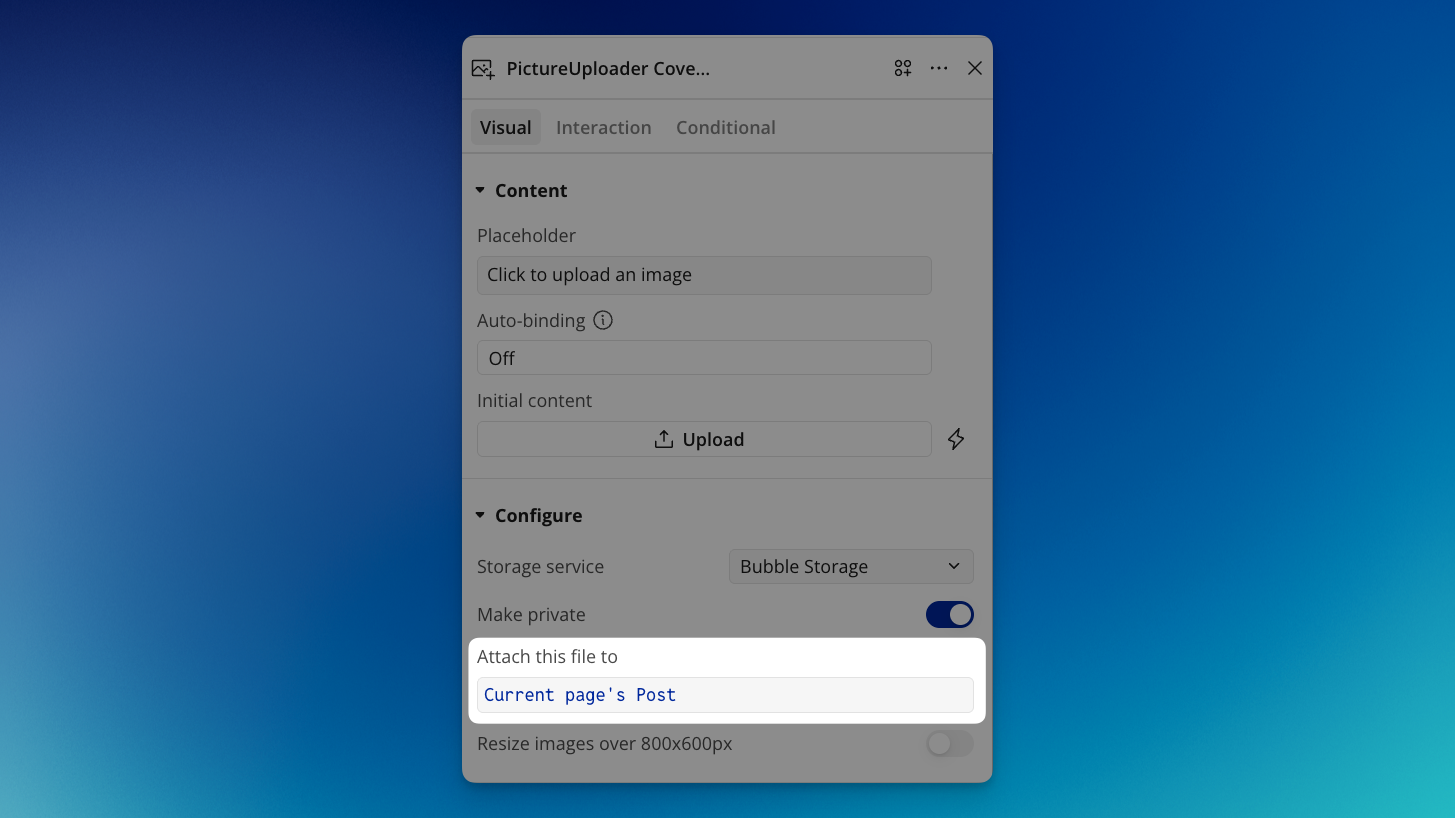
A dynamic field appears where you specify which database thing to attach the file to. In this example, we've set it to the `Current page's Post`.

Attaching the image file to a thing is what ties its privacy to that record. Once a file is attached, it inherits the privacy rules of that thing's data type. If you attach a private file to a post, the post's privacy rules now govern the file too: the *View attached files* permission on the *Post* data type decides who's allowed to see it. Without attaching the file to a thing, there's no record for it to inherit rules from, which is why this step is what makes a private upload actually private.

<figure><img src="https://34394582-files.gitbook.io/~/files/v0/b/gitbook-x-prod.appspot.com/o/spaces%2F-M5sbzwG7CljeZdkntrL%2Fuploads%2FN9BISWCqMYZBEP24ZAfR%2Fmake-uploaded-file-private%203.png?alt=media&amp;token=bcb07d0a-9c6b-4cd0-8938-9b6ccd8a628d" alt="The picture uploader&#x27;s properties with the Attach this file to field highlighted, set to Current page&#x27;s Post."><figcaption><p>In the <em>Attach this file to</em> property, choose the thing whose privacy rules should govern the file. Here it's set to Current page's Post.</p></figcaption></figure>
{% endstep %}

{% step %}

#### Check the privacy rules

Marking the file private on the element isn't enough on its own. It binds the file to the thing, but the thing's privacy rules are what actually control access. Go to the *Post* data type's privacy rules and make sure *View attached files* is unchecked for anyone who shouldn't see the file. This is the setting that keeps the file itself out of reach, even from someone who somehow gets hold of its URL.

<figure><img src="https://34394582-files.gitbook.io/~/files/v0/b/gitbook-x-prod.appspot.com/o/spaces%2F-M5sbzwG7CljeZdkntrL%2Fuploads%2FkjIVJ9h1OMJDQY8nFhgB%2Fprivacy-rule-file.png?alt=media&amp;token=80075761-be0d-4521-900e-ac23ce0f78b7" alt="Privacy rules on the Post data type. The Shared with rule has View files attached to this checked, while the Everyone else rule has it unchecked."><figcaption><p>The View files attached to this permission is what controls access to the file itself. Here it's granted to shared users but withheld from everyone else.</p></figcaption></figure>
{% endstep %}
{% endstepper %}

### Should I compress images before uploading?

Compressing and resizing images before upload is generally unnecessary for performance, since Bubble automatically optimizes images for display through its CDN caching and transformation process.

If saving storage space is a priority, though, resizing and compressing images to the size they'll most often be displayed at can help. When you do, make sure the images are still large enough for screens bigger than your own. For example, if you're testing a background image on a Full HD monitor, a higher-resolution image may be needed to keep it sharp for users on 4K monitors.

For apps where image quality is crucial, we recommend uploading images at the maximum resolution they'll be viewed at. This gives the best experience for everyone, whatever their screen size.

### Managing user-uploaded images

When users upload images, you may lose control over the initial file size, which can lead to more storage use than you intended. Since Bubble doesn't include native image processing, you can address this in one of two ways.

#### Set a maximum file size

You can configure the picture uploader element to enforce a maximum file size. This pushes users to reduce their file size before uploading, helping you keep control of your storage.

#### Use a plugin

Plugins can offer features like image compression before upload. For the best results, choose a plugin that stores the compressed image in Bubble's file storage, so the image still benefits from Bubble's caching and transformation process.

#### Compression with the file uploader

Compression and resizing also apply to images uploaded through the file uploader element. They're applied when the image is first loaded, rather than during upload, so the same rules described above apply here too.

Since the file uploader supports a wider range of formats, some files aren't optimized, such as SVGs and animated GIFs. HEIC and HEIF, Apple's image formats, aren't officially supported.

### Images uploaded via plugins

Images uploaded through a plugin behave the same as other uploads, as long as they're stored in Bubble's file storage. If a plugin stores the image in an external storage service instead, the caching and transformation process won't happen.

<details>

<summary>Bypassing the CDN transformation layer</summary>

To bypass the automatic optimization of an image, you can append this parameter to the image URL:

`?ignore_imgix=true`

This advanced feature disables Bubble's image optimization for that specific image. Use it with caution, since it can affect performance and loading times. If you're not sure whether you need it, it's best to leave it alone.

</details>

## Managing images in a mobile app

### Uploading images on iOS/Android

To upload an image in an Android or iOS app, you can use the built-in **camera library** or the user can take a photo using the **built-in camera** feature.

An important difference between the web app method and the native mobile method is that web apps rely on an element (picture uploader), while the native mobile method relies on actions.

{% hint style="warning" %}
As soon as a user uploads a file, it's sent to the file storage server and has a live URL that anyone with the link can view, even before you've saved that URL to the database. To keep files private, see using [privacy rules with files](#uploading-private-images-1) below.
{% endhint %}

### Uploading images from the camera library

{% stepper %}
{% step %}

#### Set up an event

Start a workflow from a user action, such as a button click.
{% endstep %}

{% step %}

#### Add the *Open camera library* action

Add the **Open camera library** action to the workflow. This opens the device's photo library so the user can pick an image.
{% endstep %}

{% step %}

#### Choose single or multiple files

Set whether the user can select a single file or multiple files.
{% endstep %}

{% step %}

#### Save the result to the database

Add a **Make changes to a thing** action after it. On the field where you want to store the image, set the value to `Result of step X` (the step that ran the camera library), so the uploaded image's URL is saved.

If you're uploading multiple images, make sure the field is set up to hold a list.
{% endstep %}
{% endstepper %}

### Take an image with the device camera and upload it

{% stepper %}
{% step %}

#### Set up an event

Start a workflow from a user action, such as a button click.
{% endstep %}

{% step %}

#### Add the Open device camera action

Add the **Open device camera** action to the workflow. This opens the device's camera so the user can take a photo.
{% endstep %}

{% step %}

#### Choose whether to save to the camera library

Use the *Save to camera library* property to decide whether the captured photo is also saved to the device's photo library.
{% endstep %}

{% step %}

#### Save the result to the database

Add a **Make changes to a thing** action after it. On the field where you want to store the image, set the value to `Result of step X` (the step that ran the camera), so the photo's URL is saved.
{% endstep %}
{% endstepper %}

{% hint style="info" %}
The **Open device camera** action captures a single photo at a time. To let users select more than one image at once, use the **Open camera library** action instead.
{% endhint %}

#### Saving the URL in the database

Once an image is uploaded through one of the actions, the actions `Result of step X` value returns the image's URL. You then use a workflow to save that URL to an image field on the relevant data type.

<figure><img src="https://34394582-files.gitbook.io/~/files/v0/b/gitbook-x-prod.appspot.com/o/spaces%2F-M5sbzwG7CljeZdkntrL%2Fuploads%2FMA4B97H9eyvyIXphTkpz%2Fsave-image-from-camera.png?alt=media&amp;token=0563e866-c93e-44ff-9653-abcdd2f17fd4" alt="A mobile workflow triggered by a button tap, with an Open camera library action followed by a Make changes to Post action that saves Result of step 1 to the post&#x27;s cover_image field."><figcaption><p>After the image uploads, a <a href="/core-resources/bubble-workflows/bubble-actions/database-actions.md#make-changes-to-thing">Make changes to a thing</a> action saves its URL to a field on the record. Here, the camera library's value is saved to the post's cover_image field.</p></figcaption></figure>

### Uploading private images

Private images are linked to a specific database record and inherit the privacy rules of that data type. For example, if a user uploads a cover image to their blog post, the image file is protected according to the privacy rules set on the *Post* data type.

Keeping a file private takes a few settings, in two places: the *Open camera library/Open device camera* actions, and the privacy rule connected to that thing.

{% stepper %}
{% step %}

#### Make the file private

<figure><img src="https://34394582-files.gitbook.io/~/files/v0/b/gitbook-x-prod.appspot.com/o/spaces%2F-M5sbzwG7CljeZdkntrL%2Fuploads%2FdpSeoak7sdNS5BKCcce4%2Fprivate-image-photo-library.png?alt=media&amp;token=8d402ae5-87a7-4ab2-ad55-013bf6c4b19f" alt=""><figcaption></figcaption></figure>

On the *Open camera library* or *Open device camera* action, enable *Make this file private*.<br>
{% endstep %}

{% step %}

#### Attach it to a thing

A dynamic field appears where you specify which database thing to attach the file to. In this example, we've set it to the `Parent group's Post`.

Attaching the image file to a thing is what ties its privacy to that record. Once a file is attached, it inherits the privacy rules of that thing's data type. If you attach a private file to a post, the post's privacy rules now govern the file too: the *View attached files* permission on the *Post* data type decides who's allowed to see it. Without attaching the file to a thing, there's no record for it to inherit rules from, which is why this step is what makes a private upload actually private.

<figure><img src="https://34394582-files.gitbook.io/~/files/v0/b/gitbook-x-prod.appspot.com/o/spaces%2F-M5sbzwG7CljeZdkntrL%2Fuploads%2FCKmAXyyGn5A6zqTAf2wE%2Fprivate-image-photo-library.png?alt=media&amp;token=2297412a-dddd-43ba-8a50-5d3f87362039" alt="The Open camera libraries properties with the Attach this file to field highlighted, set to Parent group&#x27;s Post."><figcaption><p>In the <em>Attach this file to</em> property, choose the thing whose privacy rules should govern the file. Here it's set to <code>Parent group's Post</code>.</p></figcaption></figure>
{% endstep %}

{% step %}

#### Check the privacy rules

Marking the file private on the element isn't enough on its own. It binds the file to the thing, but the thing's privacy rules are what actually control access. Go to the *Post* data type's privacy rules and make sure *View attached files* is unchecked for anyone who shouldn't see the file. This is the setting that keeps the file itself out of reach, even from someone who somehow gets hold of its URL.

<figure><img src="https://34394582-files.gitbook.io/~/files/v0/b/gitbook-x-prod.appspot.com/o/spaces%2F-M5sbzwG7CljeZdkntrL%2Fuploads%2FkjIVJ9h1OMJDQY8nFhgB%2Fprivacy-rule-file.png?alt=media&amp;token=80075761-be0d-4521-900e-ac23ce0f78b7" alt="Privacy rules on the Post data type. The Shared with rule has View files attached to this checked, while the Everyone else rule has it unchecked."><figcaption><p>The View files attached to this permission is what controls access to the file itself. Here it's granted to shared users but withheld from everyone else.</p></figcaption></figure>
{% endstep %}
{% endstepper %}

## Deleting uploaded images

{% hint style="info" %}
This method works the same in both web and native mobile apps.
{% endhint %}

Removing the contents of an image field only clears the URL stored on the thing. The file itself stays on the storage server, still accessible to anyone with the link. To delete the file as well, you need to run two actions, and the order matters.

{% stepper %}
{% step %}

#### Delete the file

Use the [**Delete an uploaded file**](/core-resources/actions/data-things.md#delete-an-uploaded-file) action first. This action needs the file's URL to know which file to remove, so it has to run while the URL is still saved on the thing. If you cleared the field first, the action would have nothing to point to.
{% endstep %}

{% step %}

#### Clear the field

Use a [**Make changes to a thing**](/core-resources/bubble-workflows/bubble-actions/database-actions.md#make-changes-to-thing) action to clear the image field that stored the URL. This makes sure you're not left holding a URL that points to a file that no longer exists.
{% endstep %}
{% endstepper %}

## FAQ: Images

<details>

<summary>Does Bubble change my image when I upload it?</summary>

No. When you upload an image, Bubble doesn't modify the original file. No resizing, compressing, or altering happens during upload, and the original is stored exactly as you uploaded it. Bubble generates optimized copies separately, at run time, when the image is displayed.

</details>

<details>

<summary>How does Bubble optimize images for display?</summary>

Bubble uses a CDN transformation layer to render images dynamically. When an image is displayed, Bubble works out the optimal size and compression for the container or device, then creates a temporary resized or compressed copy of the original. Each time the image appears in a new context, like a small icon versus a full-width banner, a new copy is generated on the fly.

</details>

<details>

<summary>When does this automatic optimization apply?</summary>

It applies to images shown in image elements or as backgrounds, under three conditions: the image isn't attached to a private Bubble thing, it's stored in Bubble's file storage, and it isn't an SVG. SVGs aren't compressed, since they're vector-based and scale without losing quality.

</details>

<details>

<summary>Do the optimized copies count toward my storage?</summary>

No. Cached copies are managed within Bubble's performance infrastructure and don't count toward your storage limit. They're stored for up to 30 days, and this caching applies even if you delete the original, so transformed versions can still be accessed for up to 30 days after deletion.

</details>

<details>

<summary>Should I compress or resize images before uploading?</summary>

For performance, it's generally unnecessary, since Bubble optimizes images automatically. If saving storage space is a priority, resizing and compressing to the size the image will most often be displayed at can help. Just keep the image large enough for screens bigger than your own. For apps where image quality is crucial, upload at the maximum resolution the image will be viewed at.

</details>

<details>

<summary>How do I control the size of images my users upload?</summary>

You have two options. You can configure the picture uploader element to enforce a maximum file size, which pushes users to reduce their file size before uploading. Or you can use a plugin that compresses images before upload. If you use a plugin, choose one that stores the compressed image in Bubble's file storage, so it still benefits from Bubble's caching and transformation process.

</details>

<details>

<summary>Are images uploaded through the file uploader optimized?</summary>

Yes. Compression and resizing apply to images uploaded through the file uploader too, applied when the image is first loaded rather than during upload. Since the file uploader accepts a wider range of formats, some files aren't optimized, such as SVGs and animated GIFs. HEIC and HEIF, Apple's image formats, aren't officially supported.

</details>

<details>

<summary>Can I turn off Bubble's image optimization?</summary>

Yes, for a specific image, by appending `?ignore_imgix=true` to the image URL. This is an advanced feature that disables optimization for that image. Use it with caution, since it can affect performance and loading times.

</details>

<details>

<summary>How do I let users upload images in a web app?</summary>

Use the picture uploader element. When the user clicks it, the operating system's file selector opens so they can choose an image. The element's value returns the image's URL, which you then save to an image field using a workflow.

</details>

<details>

<summary>How is uploading images different in a native mobile app?</summary>

Web apps use an element (the picture uploader), while native mobile apps use actions. You can add the *Open camera library* action to let users pick from their photo library, or the *Open device camera* action to let them take a photo. As with web, you then use a *Make changes to a thing* action to save the result to an image field.

</details>

<details>

<summary>Can users upload more than one image at once on mobile?</summary>

It depends on the action. The *Open camera library* action lets you choose whether users can select a single file or multiple files. The *Open device camera* action captures a single photo at a time. If you're saving multiple images, make sure the field is set up to hold a list.

</details>

<details>

<summary>Can I save a camera photo to the user's device as well?</summary>

Yes. The *Open device camera* action has a *Save to camera library* property that decides whether the captured photo is also saved to the device's photo library.

</details>

<details>

<summary>How do I keep an uploaded image private?</summary>

Marking the file private on its own isn't enough. First, turn on *Make private* on the uploader element or camera action and attach the file to a database thing. Attaching it is what ties the file's privacy to that record, so it inherits the data type's privacy rules. Then set those privacy rules, specifically *View attached files*, to control who can access the file.

</details>

<details>

<summary>If I clear an image field, is the file deleted?</summary>

No. Clearing an image field only removes the URL stored on the thing. The file itself stays on the storage server and remains accessible to anyone with the link. To delete the file too, use the *Delete an uploaded file* action first (while the URL is still saved, since the action needs it), then a *Make changes to a thing* action to clear the field.

</details>

[^1]: A CDN transformation layer dynamically adjusts images for optimal display by resizing or compressing them based on the user's device or container size.

    This gives faster load times and reduced bandwidth without altering the original image file.

[^2]: When an image is used as a background in an element, such as a group.

[^3]: When a file is "attached" to a thing, it's protected by the privacy rules applied to that thing, which makes it inaccessible to users who don't meet those rules.

    Article section: Uploading private files

[^4]: SVG (Scalable Vector Graphics) is a file format for two-dimensional images. Unlike raster images, SVGs use XML-based code to define shapes and paths, which lets them scale without losing quality.

[^5]: While SVG files *can* be compressed, Bubble's CDN doesn't provide this. To reduce file size, compress your SVG files before uploading them.