> For the complete documentation index, see [llms.txt](https://manual.bubble.io/llms.txt). Markdown versions of documentation pages are available by appending `.md` to page URLs; this page is available as [Markdown](https://manual.bubble.io/help-guides/data/the-database/displaying-data.md).

# Displaying data

This section covers how to display data from the database in your app

Once your users submit information that becomes data, you can use page elements to display it back to them.

Container elements don't *display* data themselves. Instead, they load a thing so that all their child elements can reference it easily. This lets you load a thing into a container once, then use it as a data source to display that data and let users make changes to it.

Data is displayed either as a single thing (like viewing the current user) or as a list of things (like a list of products, contacts, or tasks). The boxes below cover both.

## Hard-coding display data

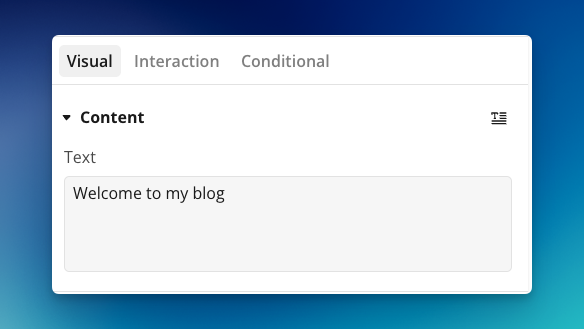
Not everything on a page has to come from the database. You can also hard-code content directly into an element, meaning you type it in yourself and it stays the same for everyone. A heading that reads "Welcome to our store", a fixed logo image, or a paragraph of static instructions are all hard-coded: the content never changes based on who's viewing the page or what's in your database.

<figure><img src="https://34394582-files.gitbook.io/~/files/v0/b/gitbook-x-prod.appspot.com/o/spaces%2F-M5sbzwG7CljeZdkntrL%2Fuploads%2FiB1QvK6WceQkTEovujUb%2Fhard-coded-text-example.png?alt=media&amp;token=dbb20d38-f16e-4023-b54c-d86704de560a" alt="The element property editor of a text element showing a hard-coded text as its content to display."><figcaption><p>Sometimes, hard-coding a text to display is the right method. </p></figcaption></figure>

Hard-coding is the right choice for content that's always the same, like labels, headings, and page copy. But most of what makes an app useful is data that changes: a user's own name, a list of products, the details of one specific post. For that, you need content that adapts to the situation, and that's where dynamic expressions come in.

{% hint style="info" %}
**Localization:** if you plan to translate your app into multiple languages, we recommend using the *Languages* feature to static text strings.

**Article:** [Translating your app](/help-guides/data/static-data/app-texts-translations.md)
{% endhint %}

## Using dynamic expressions to display data

Most of the time, displaying data comes down to writing a dynamic expression. A dynamic expression is a piece of logic that fetches a value at run time rather than being typed in ahead of time, and it's how you tell an element what to show.

{% hint style="info" %}
This article focuses on using dynamic expressions to display data. For a full look at how expressions work, see the article below.

**Article:** [Dynamic expressions](/help-guides/logic/dynamic-expressions.md)
{% endhint %}

Every dynamic expression fetches data from somewhere, a database search, the current user, a thing loaded into a parent group, and returns a value. That returned value is what the element displays.

The key thing to keep in mind is that the value has to match what the element is trying to display. A text element expects a text value, so its expression has to return text. An image element expects an image, so its expression has to return an image URL. If the expression returns the wrong type, like pointing a [date picker](#user-content-fn-1)[^1] element at an image field, Bubble will return an error in the [issue checker](/help-guides/getting-started/navigating-the-bubble-editor/tools/the-issue-tracker.md), since the types don't line up.

#### Example 1: Text element

In this example, we want to display the first name of the current user in a text element. The expression would like something like this:

{% code overflow="wrap" %}

```
Current user's First name
```

{% endcode %}

#### Example 2: Image element

In the second example, we want yo display the profile picture of the current user. In that case, we need to add an *Image* element to the page, which expects a field of type *image*.

{% code overflow="wrap" %}

```
Current user's Profile picture
```

{% endcode %}

In practice, that means displaying data is a matter of building an expression that returns the right kind of value for the element you're working with. The rest of this article walks through how that works, starting with displaying data from a single thing.

## Displaying data from a single thing

A single thing is one record from your database: one blog post, one user, one product. When you want to show the details of a specific record on a page, you're working with a single thing.

The most common way to do this is to load the thing into a container, usually a group, and let the elements inside it reference that data. Once a group has a thing loaded into it, any child element can point to `Parent group's thing` to display a piece of it, without each element needing to run its own search. This keeps your setup tidy, since every element inside the group refers to the same record.

You don't have to go through a container, though. You can also fetch data directly in an element's expression, for example by pointing a text element straight at a search. Loading the data into a parent group is usually the better approach when several elements need the same record, but for a one-off value, fetching it directly works fine.

One important thing to understand: you don't display the thing itself, you display its *fields*. A blog post record isn't something you can show on a page as-is. What you show are its individual pieces, like the post's *Title* or its *Content*. So a text element doesn't display "the post", it displays the blog post's title, or the blog post's content, one field at a time.

### Displaying a blog post

Here's how this comes together. We'll load a blog post into a group, then display its title and content in two separate text elements.

{% stepper %}
{% step %}

#### Add a group with two text elements

Place a **group** on the page, and put two **text** elements inside it. The group is the container that will hold the blog post, and the two text elements will each display a different field from it.
{% endstep %}

{% step %}

#### Search for a blog post in the group's data source

<figure><img src="https://34394582-files.gitbook.io/~/files/v0/b/gitbook-x-prod.appspot.com/o/spaces%2F-M5sbzwG7CljeZdkntrL%2Fuploads%2FZTN9K6o9fXgO2mKuUXmV%2Fsearch-one-item.png?alt=media&amp;token=a5181cb5-daf2-4248-8113-a253375b38b5" alt=""><figcaption></figcaption></figure>

Select the group and set its *Type of content* to *Post*. Then set its *Data source* to a search that returns the specific post you want, for example `Do a search for Posts:first item` with a constraint that narrows it to the right one. The group now has a single blog post loaded into it.
{% endstep %}

{% step %}

#### Display the title

<figure><img src="https://34394582-files.gitbook.io/~/files/v0/b/gitbook-x-prod.appspot.com/o/spaces%2F-M5sbzwG7CljeZdkntrL%2Fuploads%2F4eeo4CPvxbvGPHWe868X%2Fload-post-title.png?alt=media&amp;token=cb6058ec-c8e5-4130-87aa-27a5315b1446" alt=""><figcaption></figcaption></figure>

Select the first text element and set its expression to `Parent group's Post's Title`. This element now shows the loaded post's title.
{% endstep %}

{% step %}

#### Display the content

<figure><img src="https://34394582-files.gitbook.io/~/files/v0/b/gitbook-x-prod.appspot.com/o/spaces%2F-M5sbzwG7CljeZdkntrL%2Fuploads%2Fv2YsZkCOoPfasUCT5UyG%2Fload-post-content.png?alt=media&amp;token=85d9e409-2e31-449f-ae70-cf64c8252f79" alt=""><figcaption></figcaption></figure>

Select the second text element and set its expression to `Parent group's Post's Content`. This element now shows the post's content.
{% endstep %}
{% endstepper %}

With that, both text elements pull from the same post loaded into the parent group, each displaying its own field. If you later change which post the group loads, both text elements update automatically, since they reference the group rather than running their own searches.

## Displaying a list of things

A list is a collection of records of the same type: several posts, several users, several products. When you want to show more than one record at a time, like a product catalog or a feed, you're working with a list.

The idea builds directly on displaying a single thing. With a single thing, one container holds one record, and its child elements display that record's fields. With a list, a container holds a whole list of records and repeats its child elements once for each one, so the same design is reused for every record in the list.

On web, you display a list using a **repeating group**, or a **table** for tabular data. On native mobile, repeating groups aren't available, so you use a native list element instead, such as a **vertical list**, **short list**, or **section list**. They all work on the same principle: you give the container a list, and it repeats a single cell design for each record.

Just as with a single thing, you don't display the record itself, you display its *fields*. The difference is that each cell references the *current cell's thing* rather than a parent group's thing, since each cell represents a different record in the list.

### Displaying a list of products

Here's how this comes together on web. We'll display a list of products, each shown as a card with its image, name, description, and price.

{% stepper %}
{% step %}

#### Add a repeating group

Place a **repeating group** on the page. This is the container that will hold your list of products and repeat a cell for each one.
{% endstep %}

{% step %}

#### Search for products in the data source

Select the repeating group and set its *Type of content* to *Product*. Then set its *Data source* to `Do a search for Products`. The repeating group now has a list of products loaded into it, one per cell.
{% endstep %}

{% step %}

#### Design the first cell

Inside the first cell, add the elements you want to show for each product: an **image**, two **text** elements for the name and description, and one more **text** element for the price. You only design the first cell, and every other cell follows the same design automatically.
{% endstep %}

{% step %}

#### Point each element at the current cell's thing

Set each element's expression to reference the *current cell's Product*:

* The image element: `Current cell's Product's Image`
* The name text: `Current cell's Product's Name`
* The description text: `Current cell's Product's Description`
* The price text: `Current cell's Product's Price`

<figure><img src="https://34394582-files.gitbook.io/~/files/v0/b/gitbook-x-prod.appspot.com/o/spaces%2F-M5sbzwG7CljeZdkntrL%2Fuploads%2FHhiFuyaLpL3ieQDJNRG1%2Fproduct-cards%402x.png?alt=media&amp;token=65e8eaa3-27e0-4f68-b0d3-c2ab69197a05" alt=""><figcaption><p>Each card is a single cell design, repeated once for every product returned by the search. Here, two products pull their image, name, description, and price from the database.</p></figcaption></figure>
{% endstep %}
{% endstepper %}

With that, the repeating group displays every product returned by the search, each in its own card, using the single cell design you built.

The same principle carries over to native mobile: you set a list element's data source to your list of products, design one cell, and point its elements at the current item. The list element handles repeating that design for every record.

What you can see from this example is that what we display: an image, a text, a price, is still a singular piece of information repeated across the records in a list.

### Displaying a list directly in one element

You don't always need a repeating group or vertical list to show a list. Sometimes you just want a list of values displayed inline, as a single piece of text. For that, you can display the list directly in one element.

<figure><img src="https://34394582-files.gitbook.io/~/files/v0/b/gitbook-x-prod.appspot.com/o/spaces%2F-M5sbzwG7CljeZdkntrL%2Fuploads%2Fkf90OzQXZGnhETubbc3I%2Fshow-list-of-users.png?alt=media&amp;token=b6729047-b7d6-4b8c-9045-67c1d8556ca5" alt=""><figcaption></figcaption></figure>

In the example above, we have a text element. We use the `Do a search for` data source to search for a list of users, and the pick `:each items First name` as the operator:

{% code overflow="wrap" %}

```
Search for User's:each item's First name
```

{% endcode %}

The result will be the text element displaying a comma-separated list of the user's first names, such as:

> Mireille, Desmond, Yuki, Solène, Ravi

This approach is best for short, simple lists where each item is just a value or two, like a set of tags, categories, or names. When each item needs its own layout, image, or interactive elements, a repeating group (on web) or a native list element (on mobile) is the better choice, since it gives every item its own cell to design.

## Displaying data using auto-bind

Auto-bind is mainly used to automatically save changes to a thing whenever an input field changes, but it serves another purpose too: it automatically loads the *existing* data into the field it's assigned to.

<figure><img src="https://34394582-files.gitbook.io/~/files/v0/b/gitbook-x-prod.appspot.com/o/spaces%2F-M5sbzwG7CljeZdkntrL%2Fuploads%2FcVky5Qu9YZ75VMGULiX8%2Fauto-binding.png?alt=media&amp;token=14b74cf8-473c-43a0-9166-721ab7d7891b" alt=""><figcaption></figcaption></figure>

Say you didn't just want to display a blog post's title, you wanted users to be able to edit it. When you auto-bind an input element to a field, Bubble loads any existing data from that field as soon as the page loads.

{% hint style="info" %}
Auto-bind does more than display data, it also saves changes back to the database. For the full picture of how to set it up, see the article below.

Article: [Creating, saving, and deleting data](/help-guides/data/the-database/creating-saving-and-deleting-data.md#auto-binding-1)
{% endhint %}

## Other ways to learn

<details>

<summary><mark style="color:blue;">Video lessons</mark></summary>

* [Instantly modify data with autobinding](https://youtu.be/MamNYJmZjVY)

</details>

[^1]: **Article:** [Date picker](/help-guides/design/elements/web-app/input-forms/dates-and-time.md#date-time-picker) (web)\
    **Article:** [Date picker](/help-guides/design/elements/ios-and-android-app/input-forms.md#date-timepicker) (mobile)
